Saturday, November 24, 2012

Making Gloves

 Now that the cold is here, I decided to make a pair of gloves for my son. If you know the basics of crochet, you can do this project. You will not need a pattern to crochet these gloves because you are going to use your own hands to measure; ending with a custom made pair of gloves.
 Let's start making the cuff of the gloves. Start working a chain. Leave a long tale of yarn starting your chain, you will use it to sew the cuff at the end. You decide how wide you want the cuff to be. The longer the chain, the wider your cuff is going to be. We are going to work a Rib Stitch.( All the stitches on cuff are worked through back loop only) Chain the number of stitches you decided. Row 1:1 single crochet in 2nd chain from hook, 1 single crochet in each stitch, chain 1, turn. Row 2: 1 single crochet through back loop only in each stitch, chain 1, turn. Keep working same until desired length.
 Adjust the length of the cuff  with your wrist.
 And be sure that the cuff expands when you pull it off of your hand. A Rib Stitch is just a crochet elastic band. 
 Do not cut off your yarn. At the edge of the cuff work 1 single crochet on each stitch, join with a slip stitch. Work 1 single crochet all around , work several rows. Try it on and if you think that is too tight start increasing 2 single crochet in same stitch every 5 to 8 stitches apart.
It is a good idea to mark your increases to serve as a reference when you work the other glove.
When you reach the joint of your thumb increase work 2 stitches in same stitch. (mark increase) Do this increase every time you reach this point about 4 times.

You are going to end up with this (pointy shape)
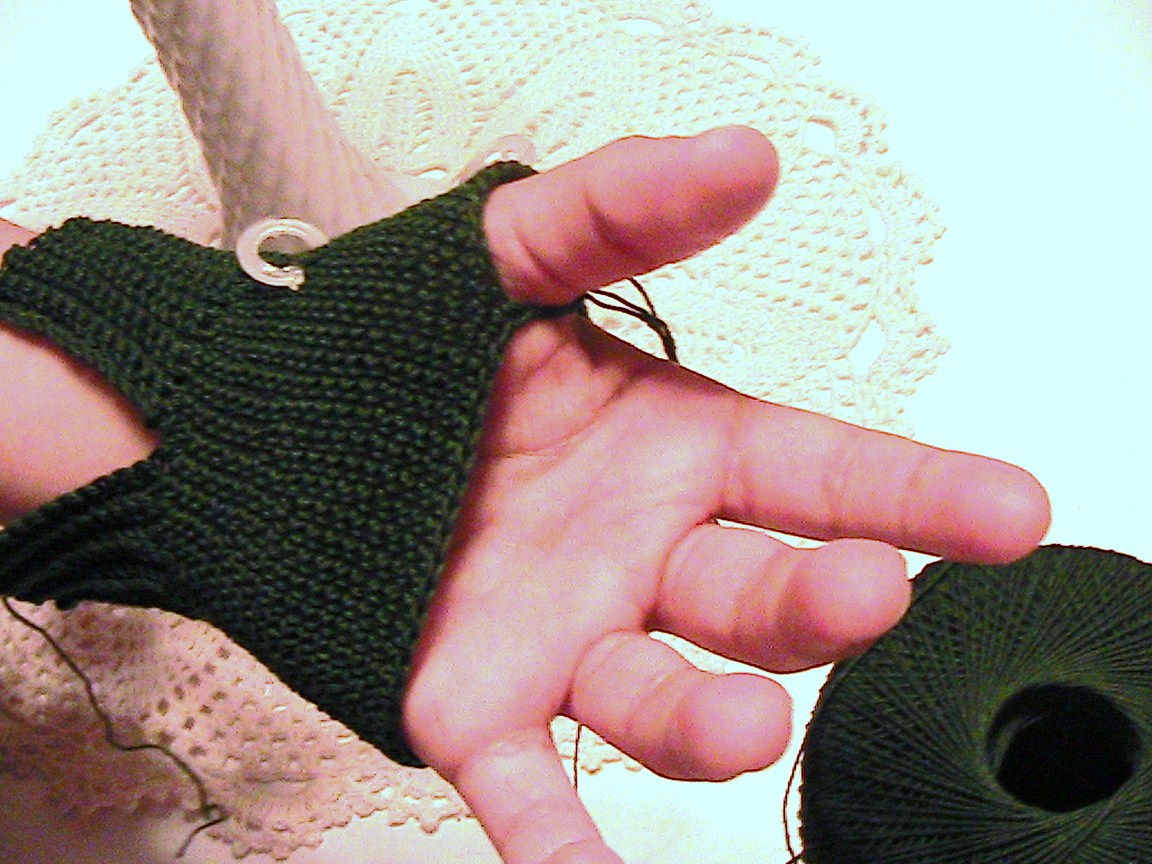
Now work a chain. Put your glove on and join this chain at the base of your thumb; if  it is too tight make it longer, join with a slip stitch.

Work 1 single crochet in each stitch around; until you cover your thumb.

At this point when you reach the nail, start decreasing every other stitch until you close the hole; slip stitch the last stitch. Draw yarn through and fasten off.

At the base of the thumb work 1 single crochet all around. Work several rows until you reach your fingers. Increase: 3 single crochet in same stitch; at the base of your little finger position .
At the base of the index finger; work a chain. Try the glove on and check the length of the chain. Join with slip stitch. 
Work 1 single crochet all around. Work several rows until your index finger is covered. When you reach your finger nail; start decreasing every other stitch until you close the hole, slip stitch the last stitch. Draw yarn through and fasten off.

Repeat instruction with each finger.


Sew wrong side of the cuff with needle, using the long piece of yarn that you left at the beginning of the cuff.
Now you're done!
And with that we have the pleasure of doing something beautiful for someone special.
********
~Who can find a virtuous woman? for her price is far above rubies.
She stretcheth out her hand to the poor, yea, she reacheth forth her hands to the needy. She is not afraid of the snow for her household: for all her household are clothed with scarlet.Strength and honour are her clothing; and she shall rejoice in time to come. Favour is deceitful, and beautiful is vain: but a woman that feareth the Lord, she shall be praised.
Give her of the fruit of her hands; and let her own works praise her in the gates.~
Proverbs 31: 10,20,21,25,30,31

Wednesday, June 6, 2012

Curtain Call Doily Pattern And Crocheted Dress

                                                                             
This beautiful doily is designed by Lucille LaFlamme. It took me six days to finish it; I hope that you like it.
Size: About 16" diameter
Materials:
Bedspread-weight crochet cotton, one (225 yd ball) ecru
Size 7 steel crochet hook, or size required for gauge
Gauge:
Rnds 1 through 5= 3 1/4" diameter
Pattern Stitches
Cluster(CL): Keeping last lp of each dc on hook, 2 dc in next lp or in next 2 sts; YO and draw through all 3 lps on hook: CL made.
Beg 4-dc Cluster (beg 4-dc CL): Ch 3, keeping last lp of each dc on hook, dc in next 3 sts, YO and draw thorugh all 4 lps on hook: beg 4-dc CL made.
4-dc CLuster (4-dc CL): Keeping last lp of each dc on hook, dc in next 4 sts, YO and draw through all 5 lps on hook:
4-dc CL made.

Instructions
Ch 9, join to form a ring.
Rnd 1: Ch 3 (counts as a dc on this and following rnds)
23 dc in ring; join in 3rd ch of beg ch-3: 24 dc.

Rnd 2: Ch 4 (counts as a dc and a ch-1 sp), *dc in next dc,
ch 1; rep from * 22 times more; join in 3rd ch of beg ch-4.

Rnd 3: Ch 5 (counts as a dc and a ch-2 sp), * dc in next dc,
ch2; rep from * around; join in 3rd ch of beg ch-5.

Rnd 4: Ch 6 (counts as a dc and a ch-3 lp on this and following rnds), * dc in next dc,
ch 3; rep from * around; join in 3rd ch of beg ch-6

Rnd 5: Ch 6, * sc in next dc; ch 4 sl st in sc just made: picot
made; ch 3, dc in next dc, ch3; rep from * 11 times more,
ending last rep without working last dc and last ch3; join
in 3rd ch of beg ch-6

Rnd 6: Ch 12 (counts as a dc and a ch-9 lp), * dc in next dc,
ch 9; rep from * 10 times more; join in 3rd ch of beg ch-12.

Rnd 7: Ch 8 (counts as a dc and a ch-5 lp), * sk next 4 chs
of next ch-9 lp, dc in next ch, ch 5, dc in next dc, ch 5; rep f
rom* 11 times more, ending last rep without working last
dc and last ch 5; join in 3rd ch of beg ch-8.

Rnd 8: Ch 6, * sc in next ch-5 lp, picot; ch 3, dc in next dc,
ch 3; rep from * 23 times more, ending last rep without
working last dc and last ch 3; join in 3rd ch of beg ch-6

Rnd 9: Ch 10 (counts as a dc and a ch-7 lp), * dc in next dc
ch 7; rep from * 22 times more; join in 3rd ch of beg ch-10.

Rnd 10: ch 11 (counts as a dc and a ch-8 lp), * dc in next
dc, , ch 8; rep from 2 22 times more; join in 3rd ch of beg ch-11.

Rnd 11: Sl st in next ch-8 lp; ch 3, 9 dc in same lp; * dc in next
dc, , 10 dc in next ch-8 lp; ch 2, 10 dc in next ch-8 lp; rep
from *11 times more, ending last rep withoug working last
10 dc; join in 3rd ch of beg ch-3.

Rnd 12: Ch 3, dc in cext 4 dc, * ch 4, sk next 5 dc, in next
dc work (dc, ch 2, dc): V-st made; ch 4 sk next 5 dc, dc in
next 5 dc, ch 2, dc in next 5 dc; rep from * 11 times more,
ending last rep without working last 5 dc; join in 3rd ch of
beg ch-3.

Rnd 13: Ch 3, dc in next 4 dc, * ch 4, sk next ch-4 lp, in
next ch-2 sp of next V-st work V-st: V-st in V-st made; ch 4
sk next ch-4 lp, dc in next 5 dc, ch 3, dc in next 5 dc; rep
from * 11 times more, ending last rep without working last
5 dc; joinin 3rd ch of beg ch-3.

Rnd 14: Ch 3, dc in next 4 dc, * ch 4, sk next ch-4 lp, V-st
in next V-st; ch 4, sk next ch-4 lp, dc in next 5 dc, ch 5 dc
in next 5 dc; rep from * 11 times more, ending last rep
without working last 5 dc; join in 3rd ch of beg ch-3.

Rnd 15: Ch 3, dc in next 4 dc, * ch 3, sk next ch-4 lp, V-st
in next V-st; ch 3, sk next ch-4 lp, dc in next 5 dc, ch 7, dc
in next 5 dc; rep from * 11 times more, ending last rep
without working last 5 dc; join in 3rd ch of beg ch-3.

Rnd 16: Ch 3, dc in next 4 dc, * ch 2, sk next ch-3 lp, V-st
in next V-st; ch 2, sk next ch-3 lp, dc in next 5 dc, ch 5, CL
(see pattern stitches) in next ch-7 lp; ch 5, dc in next
5 dc; re from * 11 times more, ending last rep without
working last 5 dc; join in 3rd ch of beg ch-3.

Rnd 17: Ch 3, dc in next 4 dc, * ch 1, sk next ch-2 sp, V-st
in next V-st; ch 1, sk next ch-2 sp, dc in next 5 dc, ch 5, CL
in next ch-5 lp; ch 3, CL in next ch-5 lp; ch 5, dc in next 5
dc; rep from * 11 times more, ending last rep without
working last 5 dc; join in 3rd ch of beg ch-3.

Rnd 18: Ch 3, dc in next 4 dc, * ch 3, sc in ch-2 sp of next
V-st, ch 3, dc in next 5 dc, ch 5, CL in next ch-5 lp; ch 3,
CL in next ch-3 lp; ch 3, CL in next ch-5 lp; ch 5, dc in next
5 dc; rep from * 11 times more, ending last rep without
working last 5 dc; join in 3rd ch of beg ch-3.

Rnd 19: Ch 3, dc in next 4 dc, * ch 2, dc in next 5 dc, ch3,
CL in next ch-5 lp; (ch 3, CL in next ch-3 lp) twice; ch 3, CL
in next ch-5 lp; ch 3, dc in next 5 dc; rep from * 11 times
more, ending last rep without working last 5 dc; join in 3rd
ch of beg ch-3.

Rnd 20:  Ch 3, dc in next 4 dc, * sk next ch-2 sp, dc in next
5 dc, (ch 3, CL in next ch-3 lp) 5 times; ch 3, dc in next 5 dc;
rep from * 11 times more, ending last rep without working
last 5 dc; join in 3rd ch of beg ch-3.

Rnd 21: Ch 3 dc in next 2 dc, * (CL over next 2 dc) twice;
dc in next 3 dc, (ch 3, CL in next ch-3 lp) 6 times; ch 3 dc
in next 3 dc; rep from * 11 times more, ending last rep
without working last 3 dc; join in 3rd ch of beg ch-3.
Rnd 22: Ch 3, dc in next dc, * (CL over next 2 sts) twice; dc
in next 2 dc, (ch 3, CL in next ch-3 lp) 7 times; ch 3, dc in
next 2 dc; rep from * 11 times more, ending last rep without
working last 2 dc; join in 3rd ch of beg ch-3.

Rnd 23: Ch 3, * (CL over next 2 sts) twice; dc in next dc,
(ch 3, CL in next ch-3 lp) 8 times; ch 3, dc in next dc;
rep from * 11 times more, ending last rep without working
last dc; join in 3rd ch of beg ch-3.

Rnd 24:  Beg 4-dc CL (see pattern stitches) over
next 3 sts; * (ch 3, CL in next ch-3lp) 9 times; ch 3, 4-dc CL
(see pattern stitches) over next 4 sts; rep from
* 11 times more, ending last rep without working last 4-dc
CL; join in top of beg 4-dc CL.

Rnd 25: Sl st in next 3 chs, in top of next CL, and in next
2 chs of next ch-3 lp; ch 1, sc in same lp; * (ch 5, sc in next
ch-3 lp) twice; ch 11, sk next 2 ch-3 lps, sc in next ch-3 lp;
rep from * 23 times more, ending last rep without working
last sc; join in first sc.

Rnd 26: Sl st in next 3 chs of nest ch-5 lp; ch 1, sc in same
lp; * ch 5, sc in next ch-5 lp, ch1, 11 dc in next ch-11 lp;
ch 1, sc in next ch-5 lp; rep from * 23 times more, ending last
rep without working last sc; join in first sc.

Rnd 27: Sl st in next 3 chs of next ch-5 lp; ch 1, sc in same
lp; picot; * (ch 3, sk next dc, dc in next dc, picot) 5 times;
ch 3, sc in next ch-5 lp, picot; rep from * 23 times more,
ending last rep without working last sc and last picot; join in
first sc.

Finish off and weave in ends.


After making this doily, I decided to use the pattern to make a dress. I used it especially to make the skirt of the dress; as you can see in the picture.

After using the doily pattern to start the skirt, the rest of the skirt is worked in a classic Shell Trellis pattern.
What inspired me to make this dress was the golden days of 1920. The silhouette is straight down, with the waist set low on the hipline. The top of this dress is simply worked on two rectangles, worked on Double Crochet and  Puff Stitch.

The Puff stitch is made by working a yarn over your hook, insert hook into 1ch space, draw up a loop, repeat 5 times, yarn over, draw through 10 loops, yarn over, draw through remaining 2 loops on hook. 1 puff made.
The front of the dress is worked vertically and the back horizontally using a Double Crochet stitch., as you can see in the picture. I made it this way because I wanted a Puff stitch on the edges of the front rectangle . For that motive I worked the back horizonally; that way in the moment of sewing the front and back together, the stiches will match perfectly. 

And this dress is not complete without a pair of matching gloves to complete the look.

~I want to wish you success in everything you do and have a wonderful day~


Thursday, March 8, 2012

Decorating With Crochet

I've been busy crocheting and it is something I really enjoy. I love to work on my doily everywhere specially while my little boy is playing in the park--it's me time.
I found this basket with flowers in an old book and I decided to  make a pillow for my wing chair and attach the basket and flower to it.


These are photos of the doilys I have made. It is called Dahlia Doily but I made changes to the pattern.
If you are interested in making doilys, I found a great place where you can find many doily patterns http://www.crochetpatterncentral.com/directory/doilies.php
I designed this doily; but I didn't take notes in the process.

This doily is really simple. I made it while my little boy was playing.
I found the idea for this doily in the Reader's Digest Complete Guide to Needlework book. Originally it was an Irish Crochet pillow top but I made a doily instead.
My sweet grandmother sent these beautiful patterns to me. I had fun making them. This one is called Curtain Call, I am going to post the pattern of this doily soon.

This doily is called Praline Pinwheel.

This doily is called Crystal Fan; my favorite.
I designed this one; but I didn't  take notes while I was making it.
********
~I'm wishing you a beautiful day full of wonderful moments~


Saturday, February 11, 2012

Beautiful Crochet Flower Accessory

I have been in my little cocoon, keeping myself warm from the cold. Sitting on my favourite chair doing what I really love;crocheting. I want to share with you how I made this beautiful rose. It takes time but it is worth it . I made this crochet rose with a soft yarn,it looks really elegant.
I used Simply Soft from Caron. I really love the texture of this yarn and it is perfect to make flowers.To make the petal:
First work 5 chains.

Turn, single crochet on each chain.

Turn, work single crochet inserting the hook under the chain or stitch. This way you will have a double faced fabric; perfect for our petals.
Now we are going to increase the petal. At the last chain work 2 single crochet together, chain 1, turn. Keep working single crochet under the chains and increase at the end of the row working 2 single crochet together. Work until you reach about 1 1/2" long petal.
Do not fasten off. Work single crochet along the edge to give it a nice edge finish to the petal.


I made 2 small petals of about 11/2",Two medium petals of about 2"each. Four petals of about 21/2"and five petals of about 3"each.
Sew the petals: start with the smaller petal as you see on the photo.


Sew the edges of the outside--the largest--petals with a few stitches; this way the rose will not open too much.
To make the leaf: work 11chains, turn.
Single crochet across. At the last chain work 3single crochet together, see photo.

Keep working single crochet across.
At the other end work 3 single crochet together and keep working single crochet. Leave 3 last chains(to form the tip of the leaf) chain1 turn. Single crochet in each chain. At the base of the leaf work 3 single crochet together. Single crochet in each chain, leaving 3 last chains for tip (opposite side) See photo.  "Remember to insert the hook under the chain, to have a double faced fabric"


3 single crochet together at the base of the leaf.
Leave 2 chain (for side tip) of the leaf. Chain 1 turn. Single crochet on each chain.
Leave 2 chain for side tip (Opposite side) Chain 1 turn. Single crochet. Fasten off at end of base.
I hope that these instructions made sense to you. I rarely follow or read crochet patterns, I usually create my own projects.
Sew leaf to rose petal. I really love how my rose turned out. Imagine the many ways you can use this beautiful flower; on hair, as a brooch, a corsage. etc.
I made this crochet scarf and I embellished it with this beautiful red rose.

I used it on my hat too.
I don't want to finish this post without sharing how happy I am. With the beginning of a New Year, new ideas, dreams, projects, a new start. I wish you succes in all you do.

I won this beautiful burlap pillow at Daphne Nicole- Lynda Cade giveaway.I love it, I made a burlap pillow and I embellished it with crochet flowers and a basket; it is the perfect companion for my new pillow. She has beautiful accessories for your vintage lifestyle; give her a visit.
*******************
~Have a wonderful day and blessings from above~

Related Posts Plugin for WordPress, Blogger...